
Getting a Good Capture
Professional lighting equipment and a DSLR camera are always the best tools to document your work for use in a portfolio or promotional print materials, but if you need to share your work in a remote classroom setting or online environment a smartphone will work well if you follow these basic tips.
Stop in the lab during open hours if you have any questions about documenting your artwork.
Visit the Senior I.S. Studio Art Workshop page for specific details on documenting your I.S. artwork.
GOOD LIGHTING
Make sure your work is evenly lit with minimized glare and shadow. If you do not have access to reasonable lighting equipment, sunlight is an excellent option. Diffused natural sunlight, between 10 am-11am or 1- 3 pm will provide all the light you need. On sunny days it is best to set up in the shade of a building and avoid the dappled light under trees. A cloudy day can also offer ideal, diffused light.
NEUTRAL BACKGROUND
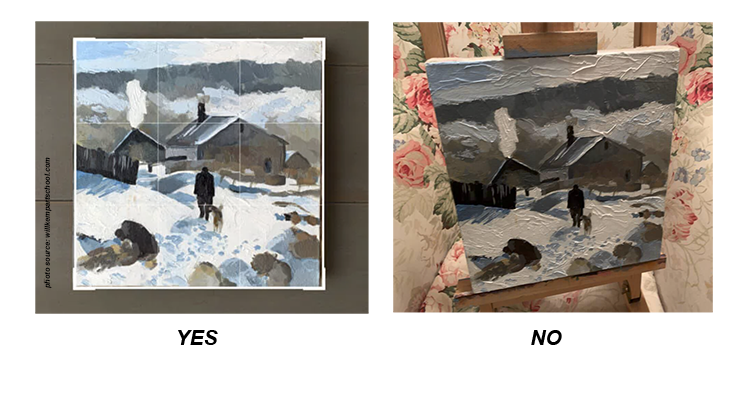
An off-white or neutral background is best. Hang your work on a wall or lay flat near a window. Lay a smaller 2-D piece on top of a blank clean paper or drop cloth. A tabletop, plain floor, or even a sidewalk can be a suitable surface, as most images will be cropped to remove backgrounds. Be sure to not cast shadows on your work if photographing from above. Take note of glare on reflective mediums. If the edge is an important part of the work, it is especially important to be mindful of your background. If you are photographing 3-D work, make sure the background has effective contrast with the material of the artwork itself.
PROPER ANGLE
To avoid distortion, use the grid feature on your smartphone for squaring up the image. For 2-D work, you can align the edge of the piece to the edge of the image area. Shift the tilt of your camera/phone slightly to adjust left, right, top, and bottom. The camera/phone lens should be parallel with the 2-D work. If the work is square in real-life, make sure it is square in your digital capture.
TRIPOD
It is always best to use a tripod and the shutter timer on your camera/phone to minimize vibration and image blur. The slightest amount of movement will affect the clarity of the image. If a tripod is not available, still use the timer so you can focus on alignment and holding the device still as the capture occurs.
EDITING
It is best to minimize the need for editing, but if your image demands further adjustments such as cropping, deskewing, resizing, white balance, or contrast/saturation, choose a capable editor like Adobe Photoshop or Lightroom. If you do not have access to either, check out free online editors such as Pixlr, Picmonkey, Canva, or Gimp.
SIZE
It is safest to capture your images at the highest resolution your device allows. While this may create large files, you can always scale down, but not up. Follow the guidelines provided by your instructor for submitting properly sized files. When in doubt, use 4″x 6″ at 300 DPI (1200 x 1800 px). This is for general reference, as your final dimensions may vary.
FORMAT
If no format is specified, JPEGs are fine for sharing temporary online images. You can also use PNG files. One advantage of PNG over JPEG is that the compression is lossless, meaning there is no loss in quality each time it is opened and saved again. TIFFs and .PSD files are typically reserved for higher resolution and archiving applications.
Check out this article for additional information about photographing your work with a digital camera.
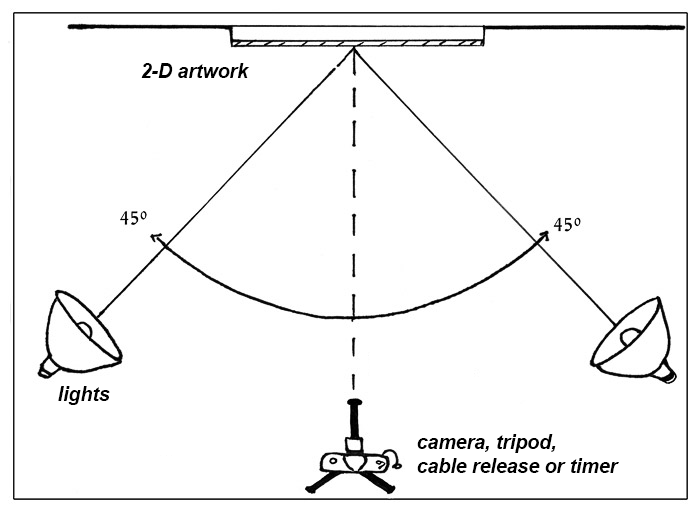
If you have sufficient lights follow the basic setup diagarm below. Diffuse the lights when possible.
Naming Conventions
As you begin to photograph and document your work, it is very important to follow best practices when naming your files. Doing so allows you to keep your artwork organized and accessible. Start early in developing and maintaining an accurate, comprehensive, and most importantly searchable naming system. For example, The College of Wooster Studio Art Majors seniors are required to submit their Senior Studio porfolios using the following naming convention:
Be sure to identify (gallery) Installation shots= Inst and Detail shots= Det, accordingly. Here, a 3 digit number is placed in front of the file name to control the order of the listing. The same 3 digit number is then used to reference an inventory page, where more detailed information about the artwork can be found. We use .jpg format for portfolio submissions, but your own art archive should include .tif format for each file. See Senior IS Portfolio Guidelines.
001_YYYYlastNameFirstNameInitial_descriptionOrTitle.jpg
002_2021WilliamsM_Inst.jpg
003_2021WilliamsM_Inst.jpg
004_2021WilliamsM_Title1.jpg
005_2021WilliamsM_Title1Det.jpg
006_2021WilliamsM_Title2.jpg
007_2021WilliamsM_Title2Det.jpg
008_2021WilliamsM_Title3jpg
009_2021WilliamsM_Title3DetA.jpg
010_2021WilliamsM_Title3DetB.jpg